


Fast-paced, real-time interactions are the norm in today’s society in order to enjoy interactive and captivating usage. Live chat, pop-up alerts, and working together are some examples of how customers could work with the clients and update them with what’s new in an instant, thus increasing their satisfaction. Traditional HTTP request-response cycles are not sufficient for these requirements, which is where WebSocket Applications using Symfony come into play.
What are WebSockets?
WebSockets are a protocol that provides full-duplex communication channels over a single long-lived connection between a client and a server. Unlike traditional HTTP requests, which follow a request-response model and are stateless, WebSockets allow for continuous, bidirectional communication. This makes them ideal for applications that require real-time updates.
Benefits of WebSockets
- Real-Time Communication: Exchange of data is done instantly due to the presence of WebSockets. Hence, users are able to integrate it into chat applications, live notifications and working as team tools.
- Reduction of Latency: WebSockets make it reusable, and there is overall less time wasted in the clients making new requests for a response.
- Saving of Resources: Use of WebSockets increases a lot of concurrency without the burden of HTTP header cost and lowers the requirement of requests than classical ones.
- Bidirectional Communication: A paradigm where the client and the server can send messages at any one time bears out engagement on both parties, and hence more dynamism in applications is witnessed.

Why Using Swoole and Redis Together with Symfony?
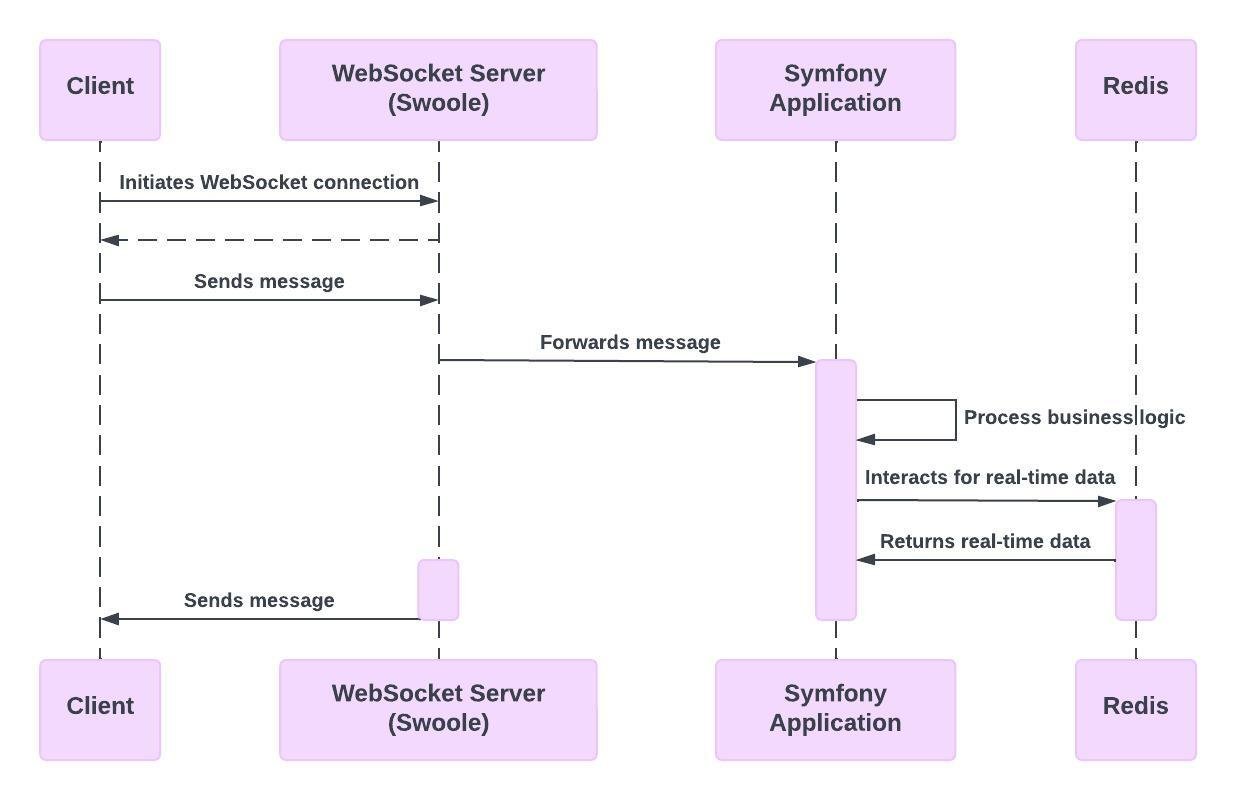
- Swoole: This is a PHP extension which is a coroutine-based one that is useful in improving the functionality of the PHP, including efficiency in the programming, with it incorporating WebSockets.
- Redis: A non-relational database that is also an online storage, cache, and messaging system used over the internet and is useful for online data applications.
- Symfony: A PHP framework that is developed with design principles to be of optimal effectiveness, providing the development of even more advanced level applications and styles.
Step 1: Install Symfony
For those who don’t have Symfony, bring into existence a fresh project of Symfony and whatever other requirements needed to make use of composer:
composer create-project symfony/skeleton my_project
cd my_project
Step 2: Now Install Swoole and Redis
Acquire the Swoole extension through pecl:
pecl install swoole In your php.ini file, activate that extension you have just installed:
extension=swoole Using composer, install redis as follows:
composer require predis/predisStep 3: Create the WebSocket Server
Make a fresh subcontract for the code that will run your webSocket server under your Symfony project:
mkdir src/WebSocketMake a fresh PHP file, ChatWebSocketServer.php and add the following code to configure a WebSocket server on it:
$redis;  <?php

namespace App\WebSocket;

use Swoole\WebSocket\Server;
use Predis\Client as RedisClient;

class ChatWebSocketServer
{
    private $redis;

    public function __construct()
    {
        $this->redis = new RedisClient();
    }

    public function start()
    {
        $server = new Server("0.0.0.0", 8080);

        $server->on("start", function (Server $server) {
            echo "Swoole WebSocket Server started at ws://127.0.0.1:8080\n";
        });

        $server->on("open", function (Server $server, $request) {
            echo "Connection opened: {$request->fd}\n";
            $server->push($request->fd, "Welcome to Swoole WebSocket Server!");
        });

        $server->on("message", function (Server $server, $frame) {
            echo "Received message: {$frame->data}\n";
            $this->redis->publish('chat', $frame->data);
        });

        $server->on("close", function (Server $server, $fd) {
            echo "Connection closed: {$fd}\n";
        });

        $this->redis->subscribe(['chat'], function ($message) use ($server) {
            foreach ($server->connections as $fd) {
                $server->push($fd, $message);
            }
        });

        $server->start();
    }
}
Step 4: Create a Symfony Command to Run the WebSocket Server
Create a new Symfony command to run the WebSocket server. In yoursrc/Command directory, create a file named WebSocketServerCommand.php:
Symfony\Component\Console\Command\Command;  <?php

namespace App\Command;

use App\WebSocket\ChatWebSocketServer;
use Symfony\Component\Console\Command\Command;
use Symfony\Component\Console\Input\InputInterface;
use Symfony\Component\Console\Output\OutputInterface;

class WebSocketServerCommand extends Command
{
    protected static $defaultName = 'app:websocket-server';

    protected function configure()
    {
        $this->setDescription('Starts the WebSocket server.');
    }

    protected function execute(InputInterface $input, OutputInterface $output)
    {
        $server = new ChatWebSocketServer();
        $server->start();
        return Command::SUCCESS;
    }
}
Step 5: Register the Command
You can also register the command in the services.yaml file as follows:
# config/services.yaml
services:
    # ...
    App\Command\WebSocketServerCommand:
        tags: ['console.command']
Step 6: Create a Client-Side Application
Create an HTML file in the public directory, index.html, to act as a client-side application:
established!");  <!DOCTYPE html>
<html lang="en">
<head>
    <meta charset="UTF-8">
    <title>Symfony WebSocket Chat</title>
    <style>
        #chat {
            width: 300px;
            height: 400px;
            border: 1px solid #ccc;
            overflow-y: scroll;
            margin-bottom: 10px;
        }
    </style>
</head>
<body>
    <div id="chat"></div>
    <input type="text" id="message" placeholder="Type a message...">
    <button onclick="sendMessage()">Send</button>

    <script>
        const conn = new WebSocket('ws://localhost:8080');

        conn.onopen = function(e) {
            console.log("Connection established!");
        };

        conn.onmessage = function(e) {
            const chat = document.getElementById('chat');
            const message = document.createElement('div');
            message.textContent = e.data;
            chat.appendChild(message);
        };

        function sendMessage() {
            const input = document.getElementById('message');
            const msg = input.value;
            conn.send(msg);
            input.value = '';
        }
    </script>
</body>
</html>
Step 7: Run the WebSocket Server
Before you can use the WebSocket server, it must be started, and the following Symfony command will do it:
php bin/console app:websocket-serverStep 8: Open the Client Application
Open the index.html file in a browser. A chat window should have opened, allowing you to chat and send text to other users in real-time.

Scaling and Reliability
In order to make sure your real-time application is scalable and reliable, the following should be taken into account:
- Horizontal Scaling: Deploy the WebSocket server on multiple instances behind a load balancer. Ensure Redis is set up in a clustered mode to achieve high availability and failover.
- Message Persistence: Messages should be saved in a message repository that can be retrieved whenever need arises and will also work as backup. Connect to the database through Symfony’s Doctrine ORM, which supports database operations management.
- User Authentication: Users should be authenticated in order to recognize them as clients. Symfony’s security component performs the client’s authentication and authorization actions.
- Monitoring: To monitor the performance and health of your WebSocket server and Redis instance, monitoring tools such as Prometheus and Grafana can be leveraged.

Conclusion
Combining Symfony with Swoole and Redis allows anyone to create high-performing real-time WebSocket software applications that can be used in business environments that require scaling. It utilizes the best of every technology in the mix and thus creates a very solid base for responsive and interactive websites. Be it a chat app, real-time notifications, or working together tools, this combination can deal with almost any tasks related to enhancing user experience.
I hope this blog post can be useful for anyone who wishes to know how to manage and create real-time WebSocket applications within the enterprise environment using Symfony, Swoole and Redis. Code on!